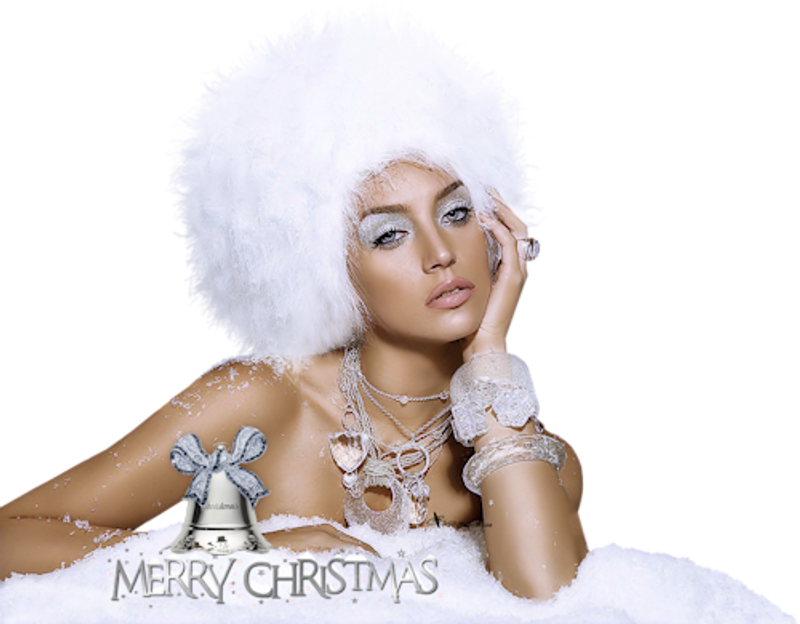
Snow Time
This lesson was created in PSP 12 but can also be created in other versions
Marion translated this lesson into English and French
I am grateful for the help of the translators of this tutorial.
Click on the flag for the translation.


Supplies
A Font of your choice
Animation Shop
Permission tubes
Here
PLUGINS
VM instant Art
VDL_Adrenaline Snowflakes
Materials
The tubes come from Pascale, JHanna.
If there is a tube of yours, please let me know so I can add your name.
Thanks to all the tube makers and creators for creating these wonderful tubes.
Leave the watermark on the tube intact.
Copyright belongs to the original artist.
Give credit to the creator.
****
The colors, blend mode, and layer density in this lesson are chosen for these materials
****
Step 1
Open your tubes in psp
Adjust - Sharpness - Unsharp mask: 1-64 -4.
Step 2
Find a light color for the foreground and a dark color for the background from your tube.
Gerrie's color choice
Foreground color to color #e7e6ee -Background color to color #768582
Step 3
Activate : JHanna_100 bground
(SHIFT + D)
Close the original
We continue to work on the duplicate
Step 4
Activate your misted tube - snowyvillage-sandipersoon
Edit - Copy.
Step 5
Activate your work
Edit-Paste as new layer
Step 6
Move the tube slightly to the left and up
Step 7
Effects - 3D - Effects - Drop shadow - of your choice
Step 8
Activate the tube - hmmoxmastreevan -250 pixels tall
Edit - Copy.
Step 9
Activate your work
Edit-Paste as new layer
Step 10
Use your move tool to move the tube into place. (see finished image)
Step 11
Effects - 3D - Effects - Drop shadow - of your choice
Step 12
Activate the tube - SantaMoon_patao
Edit - Copy.
Step 13
Activate your work
Edit-Paste as new layer
Step 14
Use your move tool to move the tube into place.
(see finished image)
Step 15
Layers- Merge- Merge All ( flatten)
Step 16
Layers- New Raster Layer
Step 17
Effects- Plugins -VM instant Art - Steel Mesh - met deze
instellingen zie screen
Step 18
Image - Add Borders - 5 pixels color black- Symmetric checked
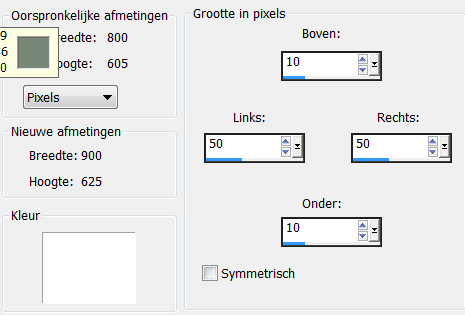
Step 19
Image - Add Borders - 50 pixels on both sides - Top and Bottom on 10 pixels
symmetric not checked -color white
Step 20
Activate the tube - Hang klokje
Edit - Copy.
Step 21
Activate your work
Edit-Paste as new layer
Step 22
Use your move tool to move the tube into place. (see finished image)
Step 23
Activate the tube - Pascale151108WomanSnow
Edit - Copy.
Step 24
Activate your work
Edit-Paste as new layer
Step 25
Use your move tool to move the tube into place. (see finished image)
Step 26
Effects - 3D - Effects - Drop shadow - of your choice
Step 27
Activate the tube : Word ART
Edit - Copy.
Step 28
Activate your work
Edit-Paste as new layer
Step 29
Use your move tool to move the tube into place. (see finished image)
Step 30
Layers- New Raster Layer
Lock your foreground color
Step 31
Take your Text Tool- use the settings below

Step 32
And write your name here in the font of your choice
On the right side or left side whatever you like.
Convert to Raster Layer
Step 33
Lock the background layer
Step 34
Activate another layer.
Layers - Merge - Merge visible .
Lock this one
Step 35
Activate the background layer and open it
Step 36
Activate Selection Tool-Custom Selection(S)-Rectangle

Step 37
Make a selection inside the window
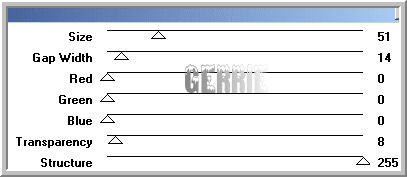
Step 38
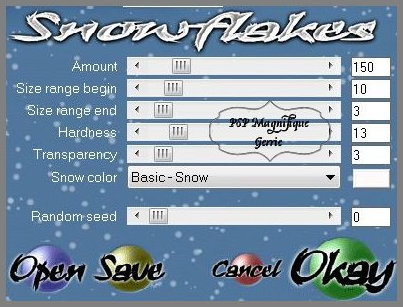
Effects- Plugins - VDL Adrenaline - Snowflakes - use the settings below
Selections- Select none
Step 39
Open the top layer
Edit - Copy special - Copy merged.
Step 40
Open your animationshop
Step 41
Edit - Paste - As a new animation.
Step 42
Go back to the paint shop and click on the Undo arrow twice
 Undo pijl
Effects- Plugins -Van der Lee - Snowflakes
Set the Random Seed to 1949.
Click OKAY..
Step 43
Selections- Select none
Step 44
Edit - Copy special - Copy merged..
Step 45
Back to Animation Shop
Edit-Paste-Paste after current frame
Step 46
Go back to the paint shop and click on the Undo arrow twice
Effects- Plugins -Van der Lee - Snowflakes Set the Random Seed to 3144.
Click OKAY..
Step 47
Selections- Select none
Step 48
Edit - Copy special - Copy merged.. .
Step 49
Back to Animation Shop
Edit-Paste-Paste after current frame
Step 50
For the Gallery
Animation - Resize animation to 800 pixels.
Step 51
File - Save as gif file - Name your image - Click next 4 times and save your image.
Did you create a lesson and want to show it off
send me an email
pspmagnifique@gmail.com
*
If you mail me your version, you can see it here,
Maroin
This lesson was written by Gerrie on the 25th of June, 2009
This lesson is and will remain the property of Gerrie.
They may not be copied or distributed without my written permission.
All my lessons are my own, so any similarity is purely coincidental.
All of my lessons are registered with TWI

Thema Index Home