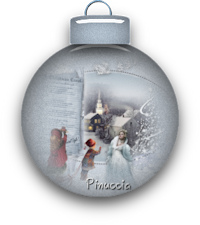
Christmas Story
Marion translated this lesson into English
Pinuccia translated this lesson into French and Italian
Katinka translated this lesson into Hungarian
Thank you so much for these translations!.
Just click on the flag to get started with the translation!


Supplies
The beautiful template is from
Scraps Dimensions
Permission tubes
Here
Materials

PLUGINS
Alien Skin Xenofex 2
Alien Skin - Eye Candy 5 - Impact
AFS Import
(Import into Filter Unlimited 2.0)
Animation Shop
The tube(S) come from Nikita, NiniTube, Bieke.
If there is a tube of yours, please let me know so I can add your name.
Thanks to all the tube makers and creators for creating these wonderful tubes.
Leave the watermark on the tube intact.
Copyright belongs to the original artist.
Give credit to the creator.
.
*****
The colors, blend mode, and layer density in this lesson are chosen for these materials
****
Step 1
Find a light color for the foreground and a dark color for the background from your tube.
Gerrie's color choice
Foreground color to color #e6e8eb -Background color to color #a9bac4.
Step 2
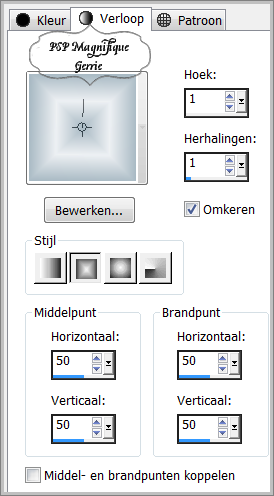
- Replace your foreground color with a rectangular foreground/background gradient configured like this
Angle 1 - Repeats 1 - Invert checked - Horizontal and Vertical on 50
Step 3
Open the SD template TAG TEMPLATE 43,
which will be the basis of your work.
Close all layers except Raster 1
Activate Raster 1
Activate Flood Fill Tool – Flood fill the layer with the gradient
Selections- Select All
Activate – image_noel_glass1 -
Edit- Copy
Edit-Paste into selection
Selections- Select None
Step 4
Effects- Image Effects- Seamless Tiling use the settings below
Effects- Image Effects- Seamless Tiling using the default settings

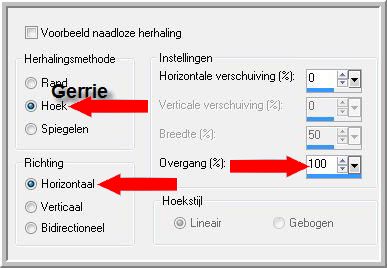
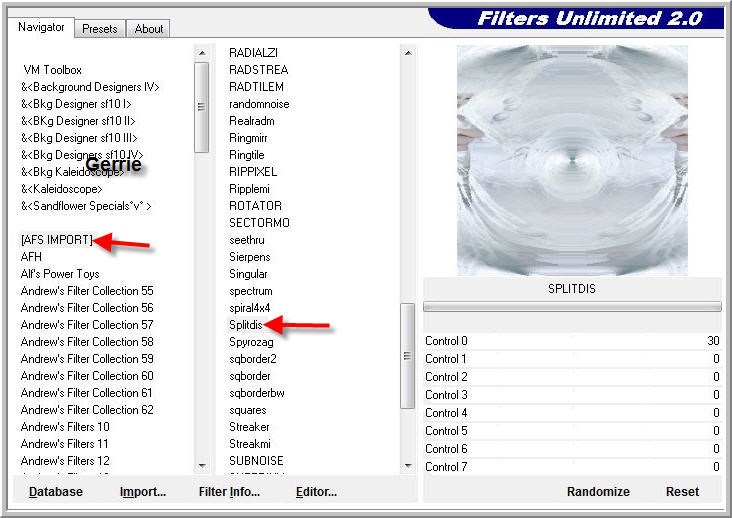
Effects- Plugins- Filter in Unlimited2.0 - AFS Import - Splitdis - use the settings below
Step 5
Layers- New Raster Layer
Selections- Select All
Activate the tube - rand van sneeuw
Edit-Copy
Activate your work - Edit - Paste into selection
Selections- Select None
Step 6
Activate the tube - 1228382379_paysages.png
remove the watermark
Edit- Copy
Activate your work -Edit - Paste as new layer
Place the tube to the bottom right
Layers- Duplicate
Image - Mirror - Mirror Horizontal (Image - Mirror in older versions of PSP)
Step 7
Activate the tube - ffondneige2
Edit- Copy
Activate your work -Edit - Paste as new layer
Place the tube to the top right (see finished image)
Layers- Duplicate
Image - Mirror - Mirror Horizontal (Image - Mirror in older versions of PSP)
You can move everything later
Step 8
Activate your accent tubes - Sneeuw 1
Edit- Copy
Activate your work -Edit - Paste as new layer
Put this tube in the middle of your work
Put everything in a nice place of your choice
Gerrie added several tubes of snow - Place these tubes at your discretion
Step 9
Activate Raster 4 in the layers palette- Unlock this layer
Selections- Select All
Selections- Float
Selections -Defloat
Activate Flood Fill Tool – Flood fill the selection with the gradient
Selection remains active
Step 10
Activate your background tube- 1252518497_noel.png
Remove the watermark
Edit- Copy
Activate your work - Edit - Paste into selection
Selections- Select None
Step 11
Activate -Raster 11 - and open this layer
We will leave this
Step 12
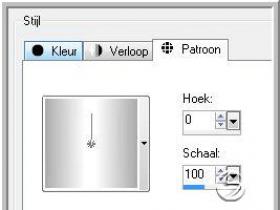
Open your pattern silverpipes in psp and set your background color to pattern
Step 13
Activate Raster 8 -unlock this layer
Selections- Select All
Selections- Float
Selections- Defloat
Flood fill the selection with the pattern
Layers-Properties-Set the Blend Mode to Multiply
Selections- Select None
Step 14
Image - Free Rotate-with these settings

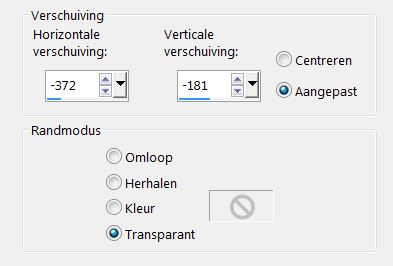
Effects - Image Effects - Offset use the settings below
Layers- Arrange- Move Down - This layer is under the layer of Raster 4.
Step 15
Activate the tube sneeuw 1
Edit- Copy
Activate your work -Edit - Paste as new layer
Place it in the center over Raster 8 - Now it is nicely positioned behind it.
Step 16
Activate Raster 5- unlock this layer
Selections- Select All
Selections- Float
Selections- Defloat
Step 17
Open - noel_glass3
Edit-Copy
Activate your work - Edit - Paste into selection
Selection remains activated
Step 18
Layers- New Raster Layer
*
Activate your accent tube - Sstyle_Poem_A-Christmas-Carol
Edit- Copy
Activate your work - Edit - Paste into selection
Selections- Select None
Image - Resize 80% - resize all layers not checked
Layer Palette- make the layer below Raster 5 active
Image - Mirror - Mirror Horizontal (Image - Mirror in older versions of PSP)
Activate your Move Tool
Put the Christmas story Sstyle_Poem_A-Christmas-Carol
in the window.( see finished image )
Adjust - Hue and -Saturation -Colorize

Layers - Merge - Merge Down
Now move this to the left side - so you can still see the house.
Step 19
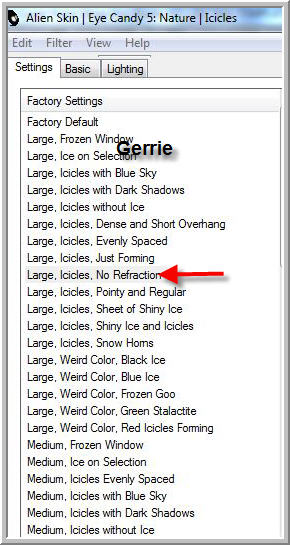
Effects- Plugins- Alien Skin Eye Candy 5: Nature - Icicles
use the settings below- Color White
.JPG)
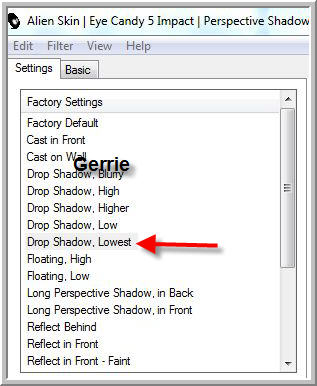
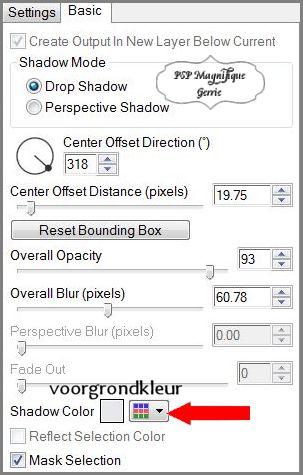
Effects- Plugins- Alien Skin Eye Candy 5: Impact -
Perspective Shadow
use the settings below- Color is your foreground color
Step 20
Activate your Christmas tree - Nini_Tube_Startree3
Edit- Copy
Activate your work -Edit - Paste as new layer
Put it in the lower right corner - see finished image
Layers- Duplicate
Layers - Merge - Merge Down
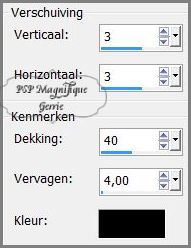
Effects - 3D - Effects - Drop shadow.
Horizontal and Vertical at 3 - Opacity at 40 - Blur at 4 - Color black
Step 21
Activate your chosen person tube- 12479955078_femmes_nikita
Image - Resize 80% - resize all layers not checked
Edit- Copy
Activate your work -Edit - Paste as new layer
Put it in the lower right corner - see finished image
Layers- Duplicate
Layers - Merge - Merge Down
Effects - 3D- Effects - Drop shadow of your choice.
Step 22
Activate the tube maan
Edit- Copy
Activate your work -Edit - Paste as new layer
Move this tube at the top right
Effects - 3D- Effects - Drop shadow of your choice.
Step 23
Activate the tube - bisontine_noelchic_element1
Edit- Copy
Activate your work -Edit - Paste as new layer
Put this tube at the top right
Effects - 3D - Effects -Drop shadow of your choice.
Layers- Arrange- Move Down - This layer is below the layer of raster 6
Activate the top of the Layers palette
Step 24
Activate the tube - Lantaarnpaal
Edit- Copy
Activate your work -Edit - Paste as new layer
-Move the tube to the bottom left
Effects - 3D - Effects -Drop shadow of your choice.
Step 25
Activate your tube of the boy with sledge- 1293385507_enfants_nikita
Edit- Copy
Activate your work -Edit - Paste as new layer
-Move the tube to the bottom left - see finished image
Effects - 3D - Effects -Drop shadow of your choice.
Step 26
Activate the tube - 1287054605 noelnikital
Edit- Copy
Activate your work -Edit - Paste as new layer
Put the girl on the sled -see finished image
Effects - 3D - Effects -Drop shadow of your choice.
Step 27
Activate the text WortArd
Edit- Copy
Activate your work -Edit - Paste as new layer
put the text at the top
Set the blend mode of this layer to Luminance ( legacy)
Effects - 3D - Effects -Drop shadow of your choice.
Layers- New Raster Layer
Add your watermark
Step 28
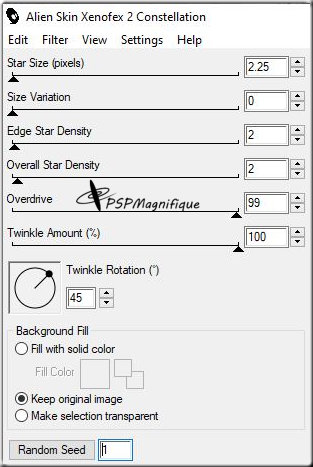
Layer palette - activate the layer of the Christmas tree
Effects- Plugins- Alienskin - Xenofex 2-
Constellation -
use the settings below
Edit- Copy Special-Copy Merged
Open Animatieshop
Edit - Paste - As new animation.
Step 29
Go back to the paintshop - Click the back arrow 1 time to go back one step.
Repeat -Effects-Plugins Alien Skin Xenofex - Contellation click 1 time on Random Seed
and OK
Edit- Copy Special-Copy Merged
Back to Animation Shop
Edit-Paste-Paste after current frame
Step 30
Go back to the paintshop - Click the back arrow 1 time to go back one step.
Repeat -Effects-Plugins Alien Skin Xenofex - Contellation click 1 time on Random Seed
and OK
Edit- Copy Special-Copy Merged
Back to Animation Shop
Edit-Paste-Paste after current frame
Edit - Select all
Step 31
For the Gallery
Animation - Resize animation to 800 pixels.
Step 32
File - Save as gif file
Give your image a name
Click next 4 times and save your image.
Did you create a lesson and want to show it off
send me an email
pspmagnifique@gmail.com
*
Additional example
This lesson was written by Gerrie on Oct. 11, 2012
This lesson is and will remain the property of Gerrie.
They may not be copied or distributed without my written permission.
All my lessons are my own, so any similarity is purely coincidental.
All of my lessons are registered with TWI

Thema Index Home


