|
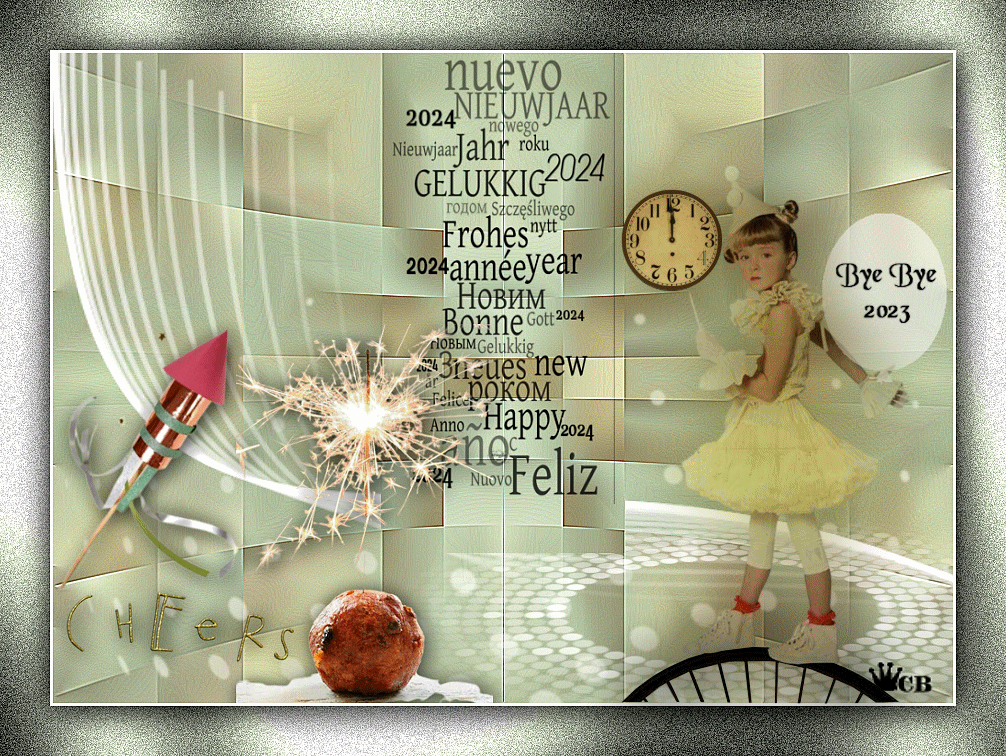
Welkom 2024
This tutorial was made with PSP 2020 ,but can be done with other versions of Psp
The colours may vary significantly depending on the Psp used.
Thanks to Carin for helping with the animation making

Supplies
Open your Tubes in PSP
Mask- Narah mask0583 ---Open the mask in PSP and minimize it
Permission tubes
Here
Filters Reneegraphisme Below:
PLUGINS
Mehdi
MuRa's Meister - Copies
Flaming Pear -Make Cube Tile
Mirror Rave - Quadrant Flip
Greg,s Factory 2 Vol.II-Pool Shadow
Nik Software Color Efex Pro3.0 Complete
Materials
The tubes are from: PSPMagnifique.
If there is a tube of yours, please let me know so I can add your name
Thank you makers and creators for making these wonderful tubes.
Leave the watermark of the tube intact. Copyright belongs to the original artist.
Leave credit with the creator..
*****
The colors, blend mode and layer density in this lesson, are chosen for these materials
Using your other materials? You can change Blend Modes according to your colors.
NOTE: If you are using different colors you might need to colorize some of the files
Or write down the background color ( K and V)
When working with your own colors, play with the Blend Mode and/or Opacity at your own discretion
.
******
Step
1
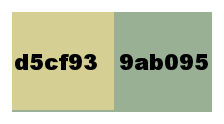
Find a light Foreground and dark Background color from your tube
Preparation
Foreground color #d5cf93
Background color #9ab095
Step
2
File: Open a transparent image in this size- 900 x 650 Pixels
Step
3
Properties Foreground-
Prepare a Foreground/Background Sunburst Gradient configured like this

Flood Fill Tool - Fill the layer with the Gradient.
Step
4
Activate your image -
pspmagnifique
Edit -Copy.
Activate your work -Edit - Paste as new layer
Stap
5
Effects - Image Effects-
Seamless Tiling-using the default settings
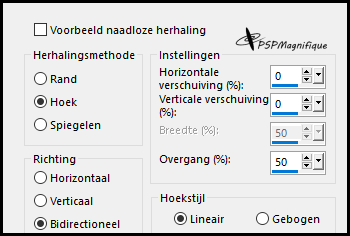 Stap
6
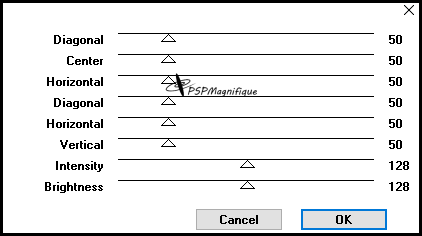
Effects - Plugins - Filter MuRa's meister - Copies -
Wall Paper with these settings
You may click Reset until you like it.
Step
7
Adjust - Blur - Gaussian Blur - Radius 30

Step
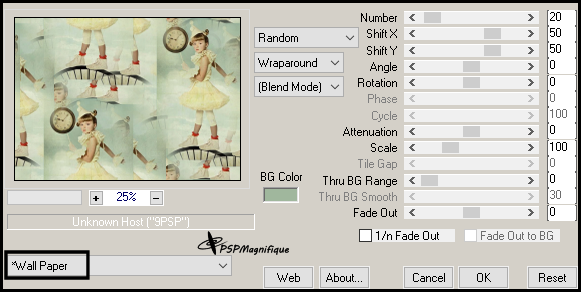
8
Effects - Plugins - Filter Mehdi - Sorting Tiles use the settings below
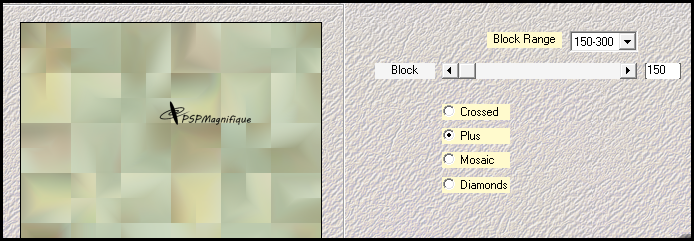
Step
9
Effects - Plugins - Filter - Mirror Rave - Quadrant Flip use the settings below
Layers- Merge- Merge All
Step 10
Effects - Plugins-Flaming Pear - Make Cube Tile
Effects- Edge Effects- Enhance More
Step 11
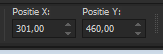
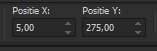
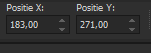
Activate Selection Tool -Custom Selection (S) -Rectangle use the settings below
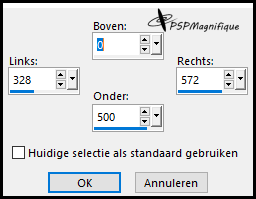
Selections - Promote Selection to Layer
Step 12
Selections - Select None
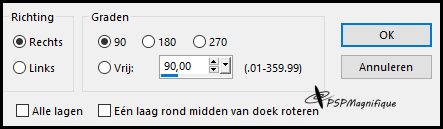
Step 13
Image -Free Rotate 90 Right
Step 14
Pick Tool: (K) on your keyboard -Enter these parameters on the toolbar
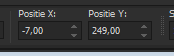
Press ( M ) to close the Pick Tool
Step 15
Effects - Distortion Effects- Warp use the settings below
Step 16
Effects-3D-Effects-Drop Shadow with these settings-Color Black

Edit-Repeat -Effects-3D-Effects-Drop Shadow
Step 17
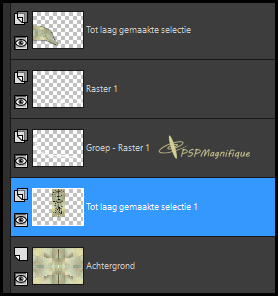
Layer Palette - Activate your Background Layer ( Bottom Layer)
Layers- New Raster Layer.
Flood Fill Tool-Fill the layer with #ffffff
Step 18
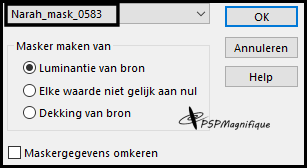
Layers-New Mask Layer– From Image– select Mask-Narah_mask_0583
t
Layers- Merge- Merge Group
Step 19
Open the tube -
Deco_01 -
Edit- Copy
Activate your work.
Edit - Paste as new layer
Step 20
Pick Tool: (K) on your keyboard -Enter these parameters on the toolbar
Press ( M ) to close the Pick Tool
Step 21
Layer Palette - Activate your Background Layer
Step 22
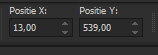
Activate Selection Tool -Custom Selection (S) -Rectangle use the settings below
Promote Selection to Layer
Layers - New Raster Layer
Step 23
Activate your accent tube new year wishes - Magnifique Ger
Edit - Copy.
Activate your work .
Edit- Paste into Selection
Selections - Select None
Step 24
Layers-Properties-Set the Blend Mode to "Multiply"
Image - Resize - to 92% - Resize all layers not checked
Slide up slightly see my example
Layers -Merge- Merge Down
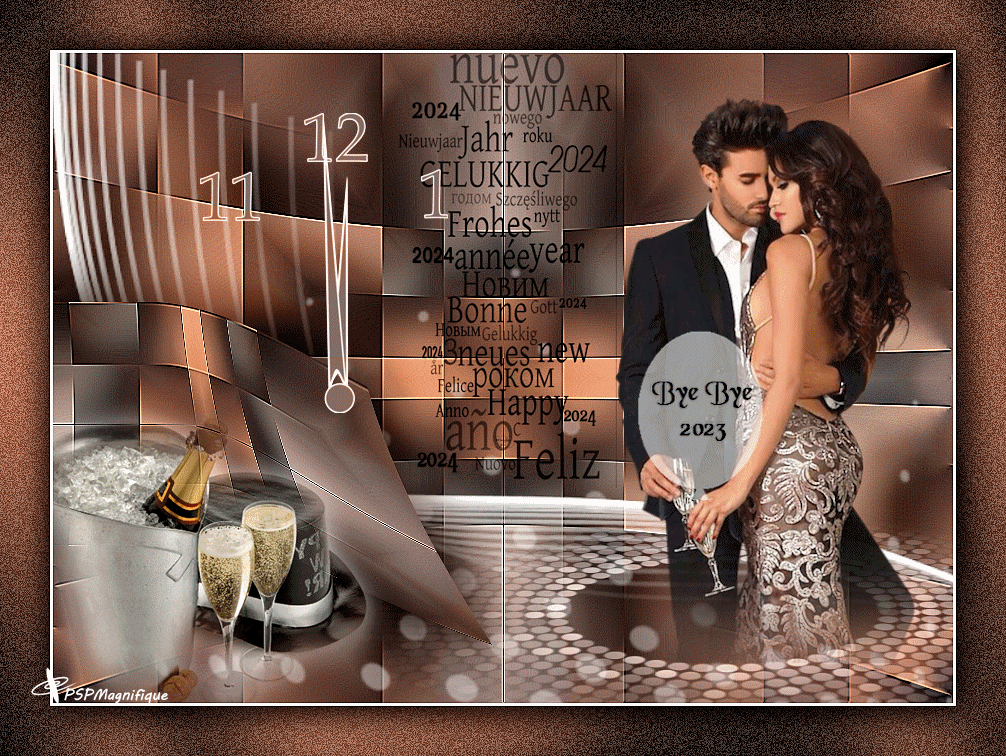
The Result
Step 25
Activate the top of the layerpalette
Open the tube
Deco_02 raket
Edit - Copy.
Activate your work
Edit - Paste as new layer
Step 26
Pick Tool: (K) on your keyboard -Enter these parameters on the toolbar
Press ( M ) to close the Pick Tool
Drop shadow to your own choice
Step 27
Open the tube - WordArt Cheers.
Edit - Copy
Activate your work.
Edit - Paste as new layer
Step 28
Pick Tool: (K) on your keyboard -Enter these parameters on the toolbar
Press ( M ) to close the Pick Tool
Drop shadow to your own choice
Step
29
Open the tube -
Deco_03.sterretje
Edit - Copy .
Activate your work.
Edit - Paste as new layer
Step 30
Pick Tool: (K) on your keyboard -Enter these parameters on the toolbar
Press ( M ) to close the Pick Tool
Drop shadow to your own choice
Step 31
Add your name and/or watermark.
Step 32
Image - Add borders-Symmetric checked: 3 Pixels - Color white
Rename this layer -Raster 1
Selections -
Select All
Step 33
Image - Add borders-Symmetric checked: 50 Pixels -Background color
Selections - Invert
Step 34
Effects - Plugins – Greg’s Factory Output Vol.II - Pool Schaduw using the default settings
Step 35
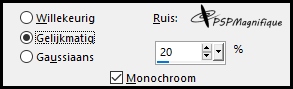
Adjust -Add/Remove Noise-Add Noise use the settings below
Selections - Invert
Stap 36
Effects–3D- Effects- Drop Shadow with these settings- Color Black

Repeat with the same settings
Selections -Select None
Step
37
Effects
-
Plugins -
Nik Software
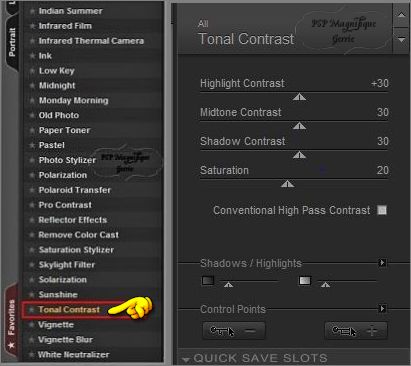
Color Efex Pro3.0 Complete ( Tonal Contrast )
and OK
 Step
Open your main tube- PSPMagnifique
_Gerrie
Edit - Copy.
Activate your work
Edit - Paste as new layer
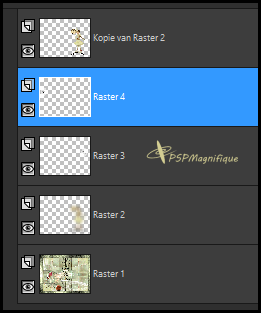
Rename this layer-Raster 2
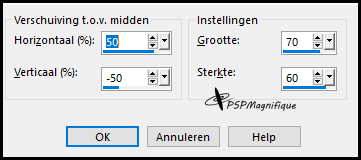
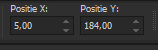
Effects - Image Effects-Offset / Hor: 264 Vert: -56-Transparent-Custom checked
This should be so in connection with the animation

Step
39
Layers- Duplicate
Adjust - Blur - Gaussian Blur - Radius 30
Layers-Properties-Set the Blend Mode to "Multiply"
or of your choice
Step
40
Raster
2 Active
Activate
tube Ballon ByeBye2023
Edit - Copy.
Activate your work.
Edit - Paste as new layer
Rename this layer-Raster 3
Step 41
Pick Tool: (K) on your keyboard -Enter these parameters on the toolbar

Press ( M ) to close the Pick Tool
Step
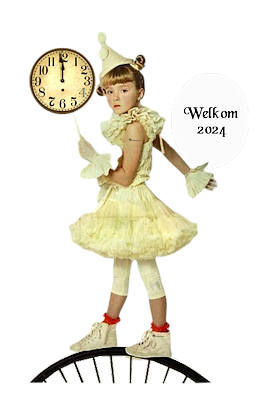
Activate tube Ballon Welkom 2024
Edit - Copy
Activate your work
Edit - Paste as new layer
Rename this layer -Raster 4
Step 43
Pick Tool: (K) on your keyboard -Enter these parameters on the toolbar
Press ( M ) to close the Pick Tool
Start of the animation
Make sure the layers are positioned so that the balloon passes behind the girl
Step 1
Close Layer 4.
Edit/Copy-Special/Copy Merged.
To AS: Edit - Paste - As a new animation.
=Frame 1
Step 2
Back to PSP.
Raster 3 active.
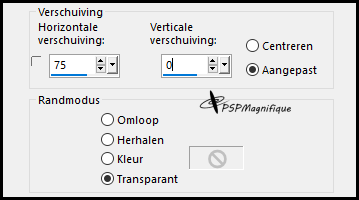
Effects/Image Effects/Offset / Hor: 75 Vert: 0
-Transparent-Custom checked
Raster 4 open and active
Layers/Duplicate -Lock this duplicated layer immediately.
Raster 4 active
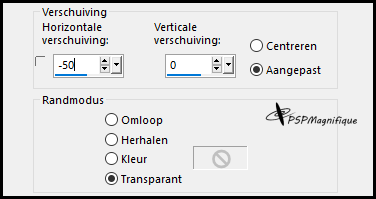
Effects/Image Effects/Offset / Hor: -50 Vert: 0 -Transparent-Custom checked
Edit/Copy-Special/Copy Merged..
To AS: Edit - Paste - After current frame.
=Frame 2
Step 3
Back to PSP..
Close Raster 3 and 4.
Open the layer Copy of Raster 4 and make active.
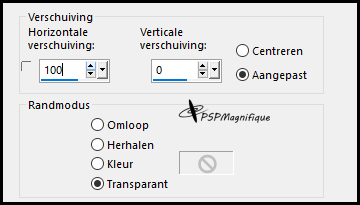
Effects/Image Effects/Offset / Hor: 100 Vert: 0 -Transparent-Custom checked
Edit/Copy-Special/Copy Merged..
To AS: Edit - Paste - After current frame.
=Frame 3
Step 4
Back to PSP....
The layer Copy of Raster 4 is still active.
Effects/Image Effects/Offset / Hor: 100 Vert: 0 -Transparent-Custom checked
Edit/Copy-Special/Copy Merged..
To AS: Edit - Paste - After current frame.
=Frame 4
Step 5
Back to PSP.
The layer Copy of Raster 4 is still active
Effects/Image Effects/Offset / Hor: 100 Vert: 0 -
Transparent-Custom checked
Edit/Copy-Special/Copy Merged..
To AS: Edit - Paste - After current frame.
=Frame 5
Step 6
Back to PSP.
The layer Copy of Raster 4 is still active
Effects/Image Effects/Offset / Hor: 100 Vert: 0 -
Transparent-Custom checked
Edit/Copy-Special/Copy Merged..
To AS: Edit - Paste - After current frame.
=Frame 6
Step 7
Back to PSP..
The layer Copy of Raster 4 is still active.
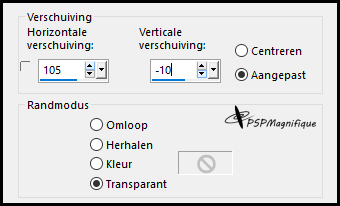
Effects/Image Effects/Offset / Hor: 105 Vert: -10 -
Transparent-Custom checked
Edit/Copy-Special/Copy Merged..
To AS: Edit - Paste - After current frame.
=Frame 7
Step 8
Back to PSP..
The layer Copy of Raster 4 is still active
Effects/Image Effects/Offset / Hor: 105 Vert: -10 -Transparent-Custom checked
Edit/Copy-Special/Copy Merged..
To AS: Edit - Paste - After current frame.
=Frame 8
Step 9
Back to PSP.
The layer Copy of Raster 4 is still active
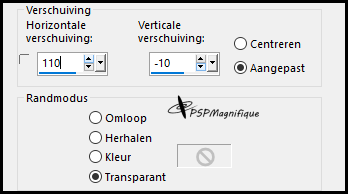
Effects/Image Effects/Offset / Hor: 110 Vert: -10 -
Transparent-Custom checked
Edit/Copy-Special/Copy Merged..
To AS: Edit - Paste - After current frame.
=Frame 9
Step 10
Back to PSP..
The layer Copy of Raster 4 is still active
Effects/Image Effects/Offset / Hor: 97 Vert: 1 -
Transparent-Custom checked
Edit/Copy-Special/Copy Merged..
To AS: Edit - Paste - After current frame.
=Frame 10

Step 11
In AS -Selections- Select All.
Animation - Frame properties 50
Select frame 1
Animation - Frame properties 250
Select frame 10
Animation - Frame properties 350
Step 12
Save your crea as a gif file
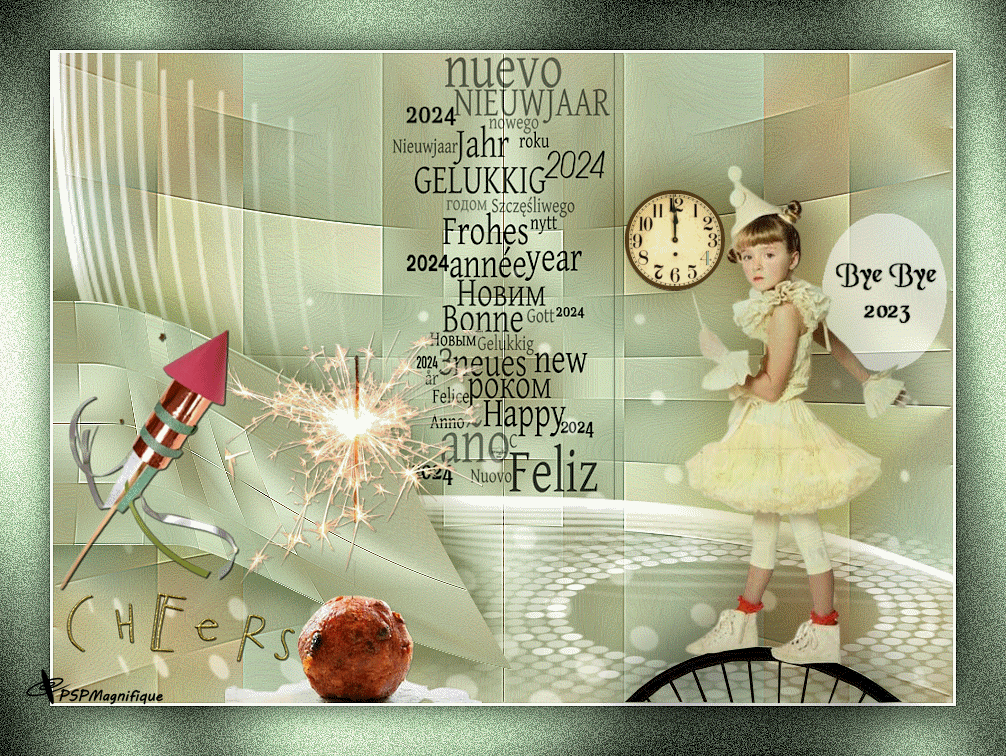
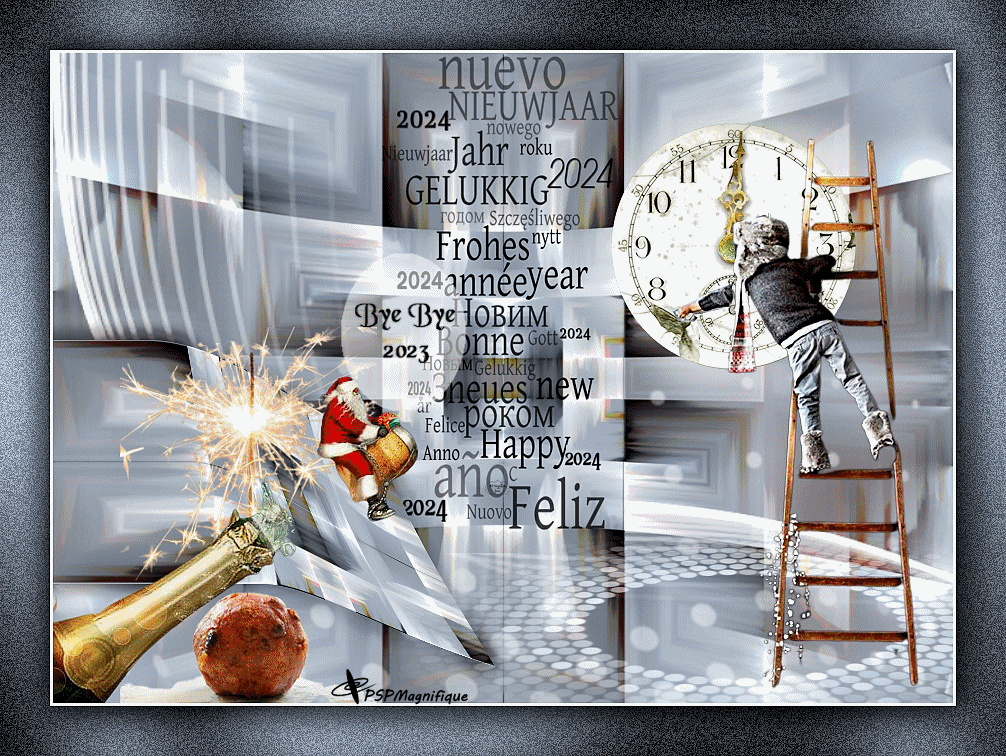
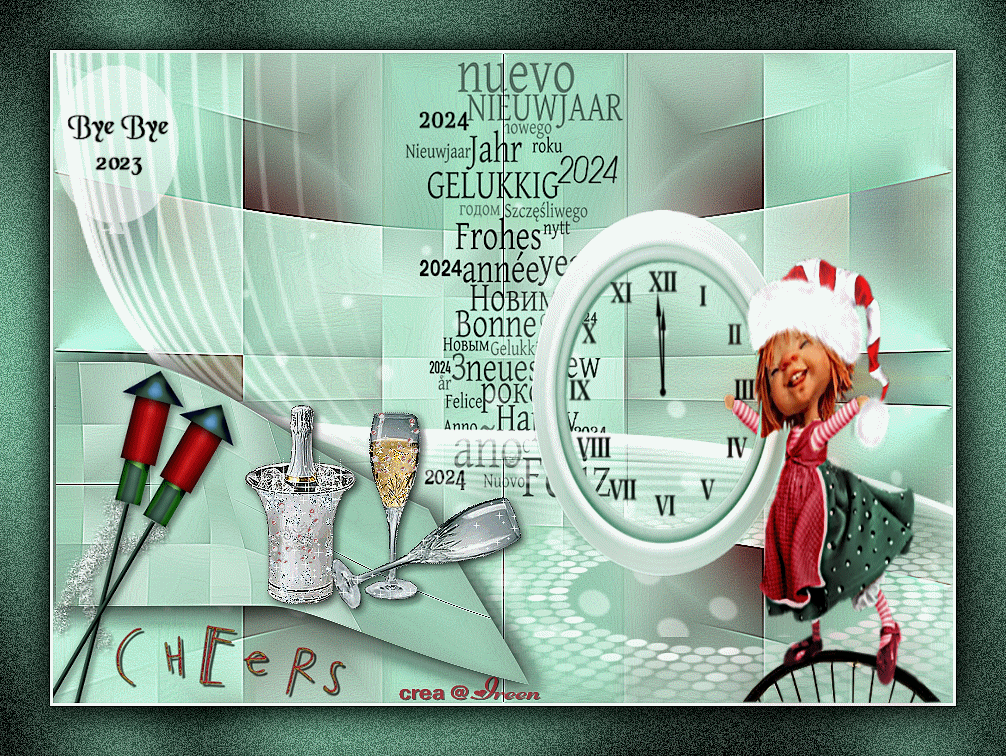
Additional example:
Thank you Jeanne for testing this lesson
Thank you Ireen for testing this lesson
Thank you Hennie for testing this lesson:
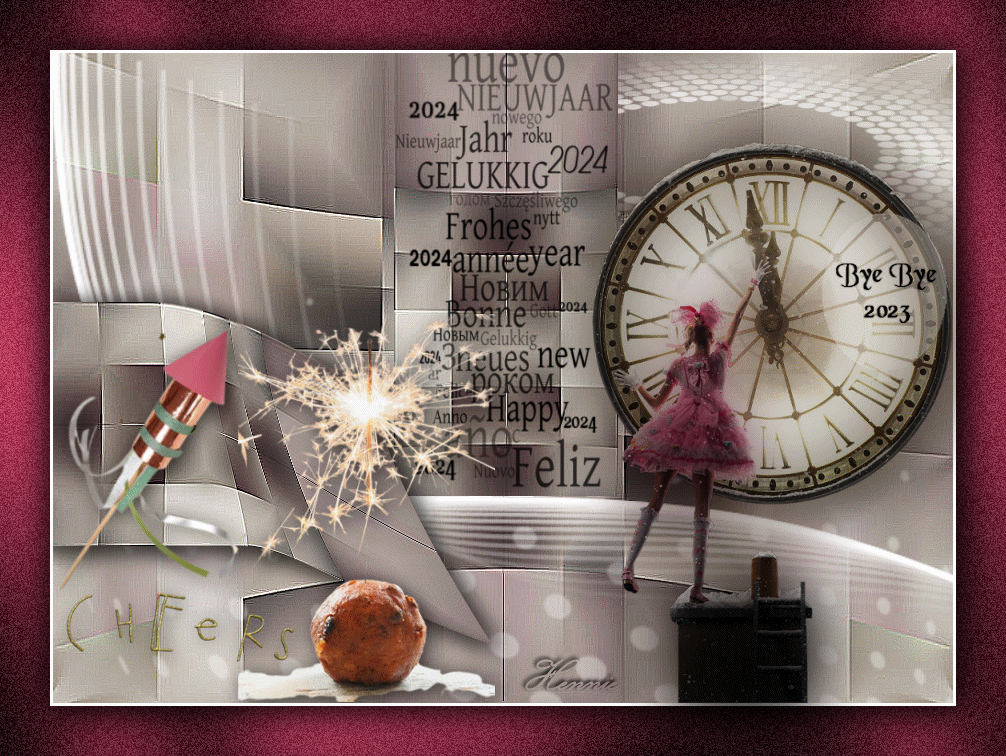
Thanks for your beautiful versions!!
.
Your
sent
creation
of the
lesson
is
displayed
below
This lesson was written by Gerrie on July 10, 2023
This lesson is and remains the property of Gerrie
It is forbidden to copy or distribute them, without my written permission.
All my lessons are self-designed so any similarity is purely coincidental
All my lessons are registered with TWI

Theme Index Home
|